Strike Industries Mass Driver Comp

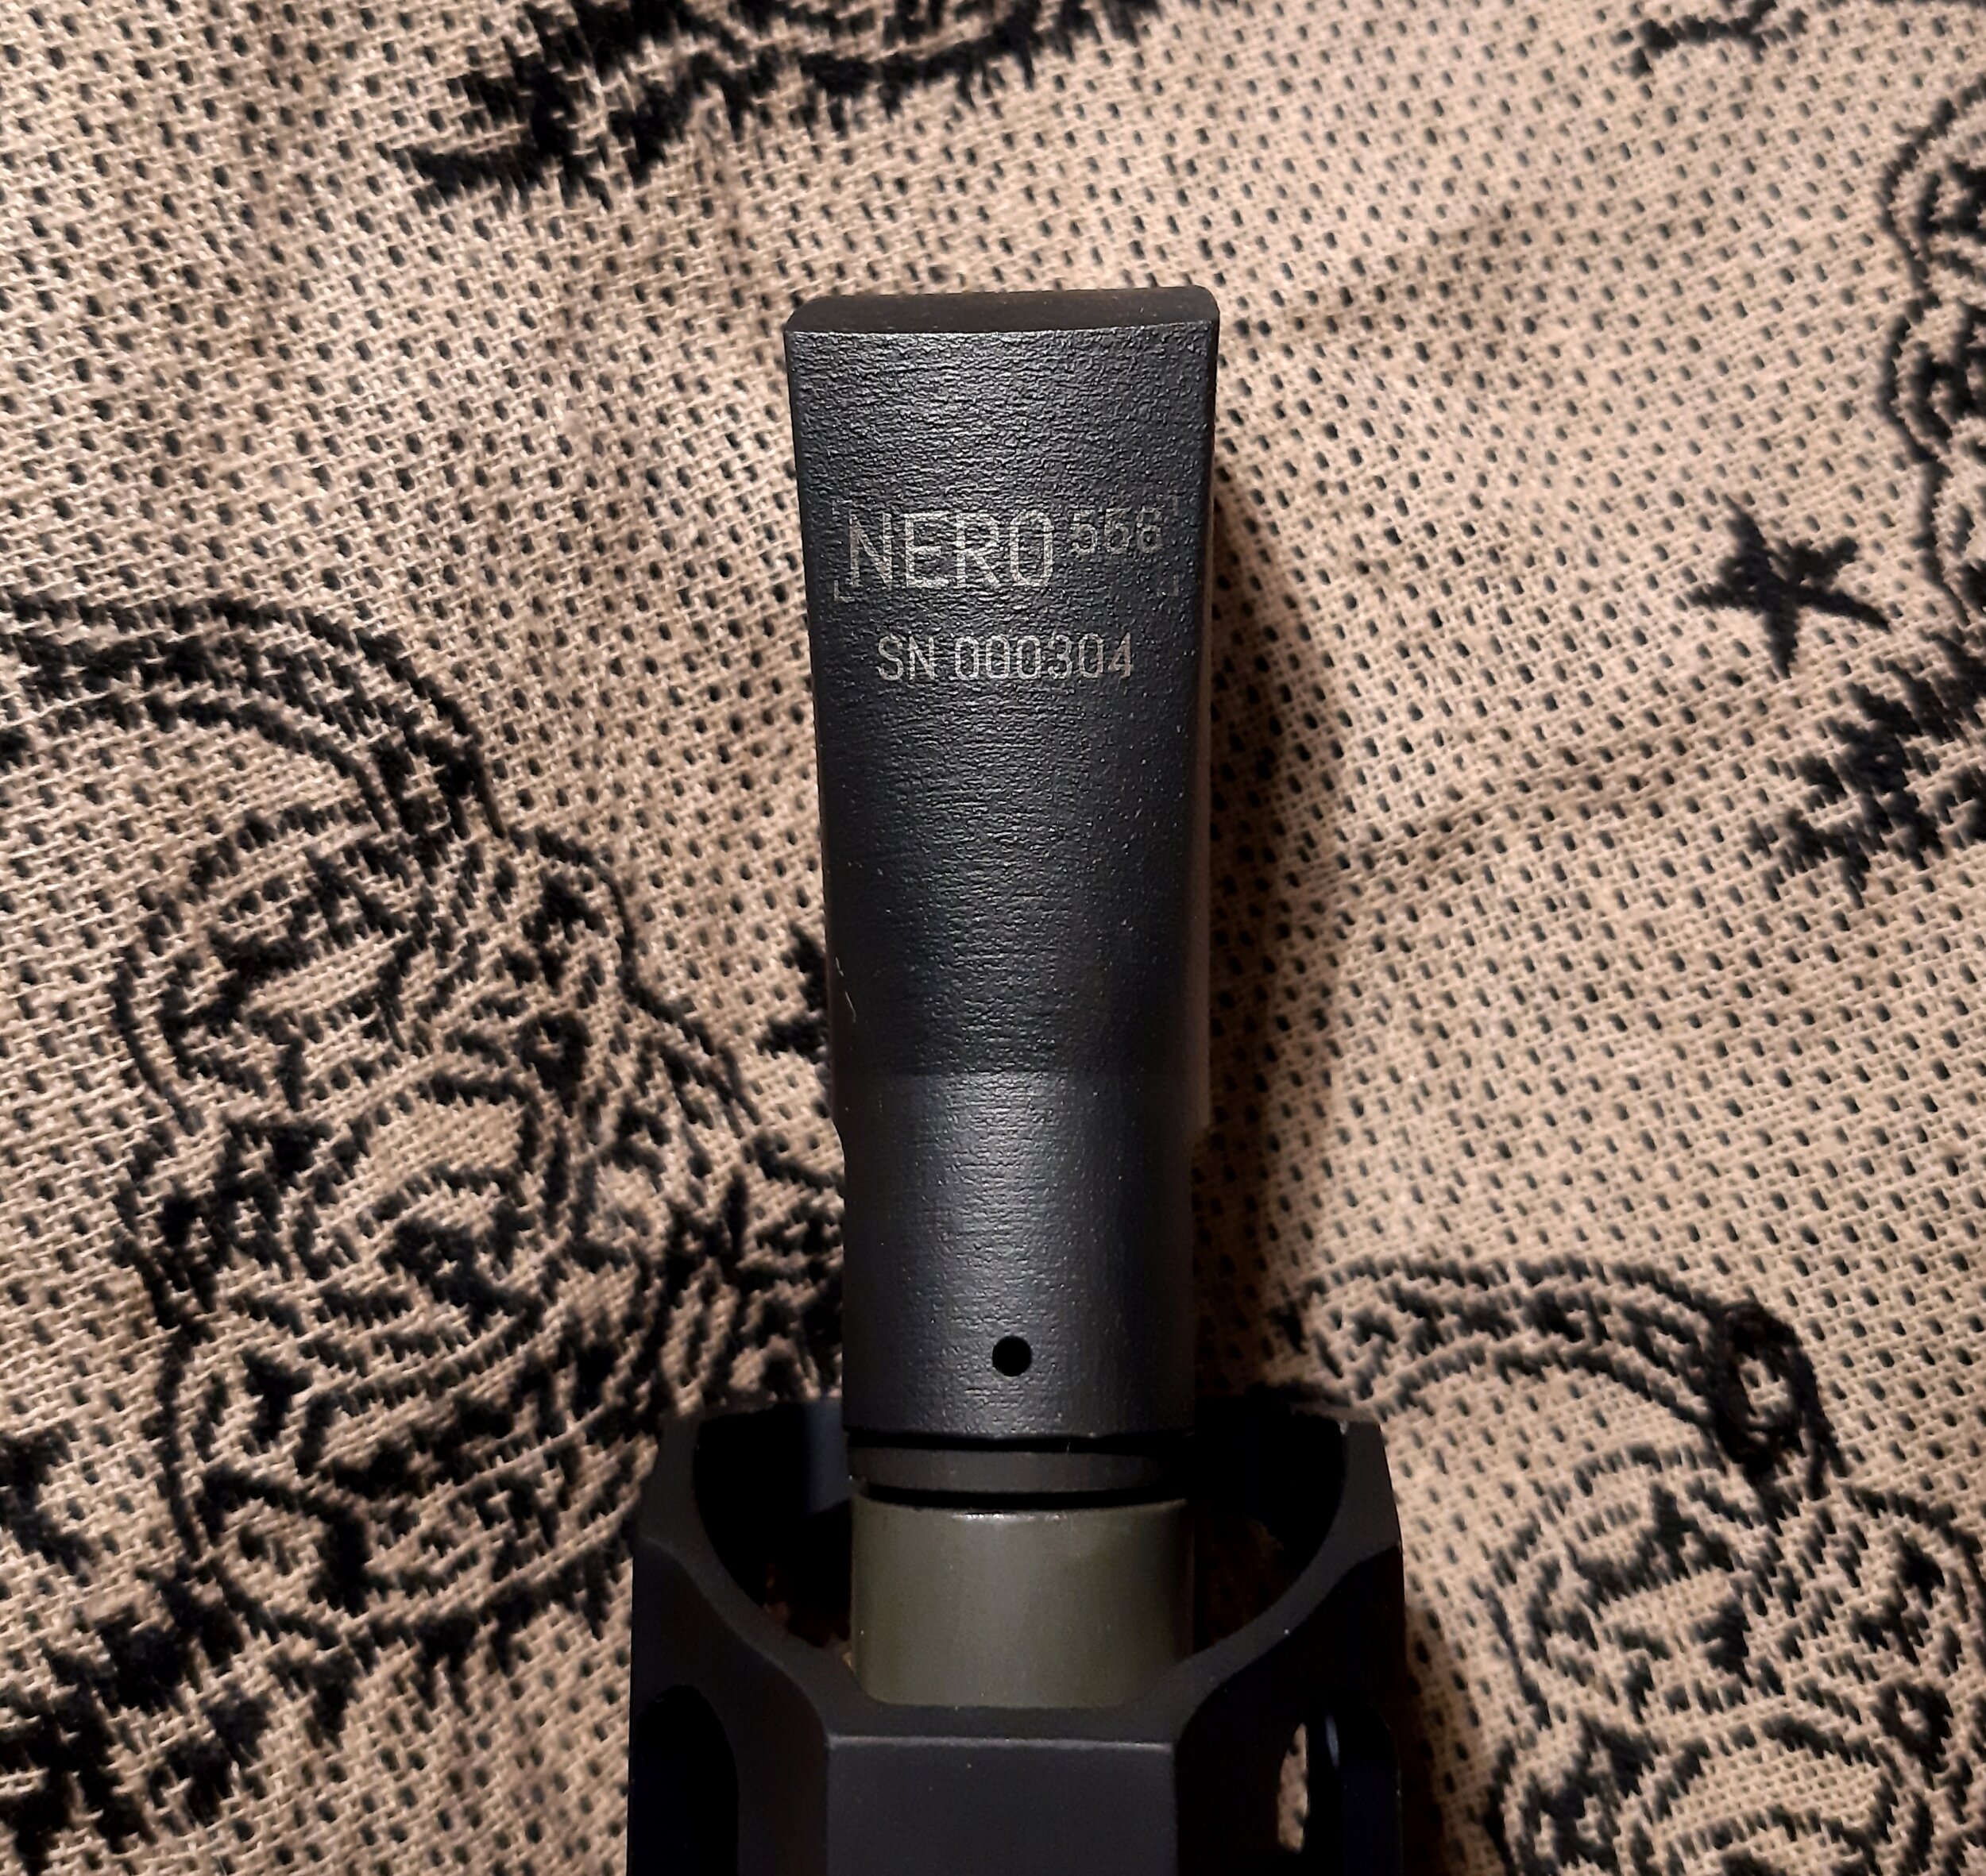
  Strike Industries recently released a compensator for Glock style pistols. It is called the “Mass Driver”. The compensator system is 50 state legal and available for Gen3 or Gen 4 style G19’s and G17’s. The Mass Driver comp I received is for a Gen 3 17. I installed it on a custom Polymer 80 PF940V2 (G17 size) pistol. The Mass Driver system is pretty unique in its application.

  Strike Industries did everyone a favor by offering the Mass Driver comp as 50 state legal. To do this, it does not use a threaded barrel. Instead the Mass Driver uses a special guide rod assembly and springs. I won’t go into installation, but Strike Industries does have a nice video of it. The guide rod assembly is what ties the whole compensator and springs together. It also keeps the compensator from twisting side to side too much. On my particular sample, the Mass Driver rests against the muzzle end of the slide. It does wear the finish a little on the slide where the compensator meets the front edge. The inside of the Mass Driver is beveled, I am assuming this is to square it up with whatever slide you use it with. For instance, I am not using it with a factory Glock slide and it functions and looks just fine. This system also allows for these modifications to not be permanent.

  A unique feature of the Mass Driver comp comes from the dual spring system. Part of the reason the compensator is called the Mass Driver, is because it actually drives the compensator forward under firing. As the bullet exits through the compensator, it “drives” the compensator forward. Then the recoil causes the slide to move backwards. Of course the Mass Driver also has ports to let muzzle gasses escape upwards and sideways, thus helping to reduce even more recoil. Because of the “counter recoil” system, it feels different when shooting the pistol, definitely not a bad thing. It is really hard to explain the recoil impulse. It is less than a non compensated pistol, of course. But it is different then a standard compensated pistol also. For me, it feels really soft, akin to shooting a 22 magnum pistol. The Mass Driver comp really does make the gun shoot more comfortably.

Looking Through Comp

  The Mass Driver comp performed well for me. I had a 30-50% reduction in recoil, according to the Mantis X10. It is a definite reduction in recoil for me. Split times for me were about 0.10 seconds faster with the Mass Driver installed. This data was with 115 grain FMJ’s, so shooting hotter loads may actually help with even more recoil reduction. I did notice that every once in a while, the first shot would not always shoot to point of aim. I am guessing that the Mass Driver comp didn’t seat against the muzzle correctly when hand cycling the pistol. Causing the recoil gases to be expended at a different angle. It wasn’t enough to prevent me from ringing 10” steel plates at 15 yards, but was noticeable on paper. I did run some 124 grain FMJ’s through it also without any problems. In all the rounds through the comp, I have had very few malfunctions. Actually, I have only had 2 failure to eject’s with my least favorite 9mm. There were more when other people shot it, but in my opinion, they didn’t have a good enough grip on the handgun, so not a Mass Driver fault, more of a public service announcement. 

  I do believe that Strike Industries made the Mass Driver comp for post apocalyptic movies. This compensator looks like it should come straight out of a Mad Max movie. It is that sexy. But along with sex appeal, it has function. The Mass Driver is the same width as a standard Glock slide, it does add about 1 ⅝” in length to the pistol. Meaning it does have the ability to fit in most open bottom holsters. I tried it in 3 different open bottom holsters, and it fits in all 3. The comp just sticks out the end. 

  I am really glad that Strike Industries came out with an effective 50 state legal compensator. It really does do everything a compensator should do, at a price that is even far less than some screw on comps. It performed better than I expected for a non-threaded compensator. If you live in one of those not-so-free states, or just want a decent compensator, definitely go give the Mass Driver a look. 

Firearms Insider Reviews - 8 Key Points

Claim to Fame:

50 state legal Glock compensator

Target Market:

Those wanting a compensator without needing a threaded barrel

FNBs (Features & Benefits of this product):

  • No threaded barrel needed

  • Counter recoil design, as the slide moves back the comp moves forward to reduce felt recoil

  • 50 State Legal

  • CNC machined

  • No permanent modification of weapon required

  • Compatible with most open-bottom holsters

  • 1.675”L  x 1.030” W x 1.430” H

  • All installation hardware included

  • Manganese Phosphate finish

What other aesthetic options or finishes are available?

Gen 4

What others are saying?:

James @ Primary Arms 5/5 stars

AMAZING COMP

This Comp is AMAZING! Works way better than comps that cost twice as much. I have about 700 rounds through it so far and no issues yet. Shoots incredibly flat, and looks awesome. Only issue is that its corners are slightly larger than the glock slide frame, so it makes it a tight fit into and particularly out of holsters where the comp gets pulled forward as you draw the pistol. No functional problem, but slightly annoying

Link to other reviews:

TFB TV

Price point:

MSRP = $89.95

Retail = $79.99 at Primary Arms

I need it now! Availability:

Strike Industries or Primary Arms

Our Rating:

Pros:

  • Recoil reduction

  • Inexpensive

  • Fits in many holsters

  • No permanent modifications to firearm 

  • 50 state legal

Cons:

  • First shot is off

  • Slide wear

Score: 8.00 Great

80.jpg

Favorite Link:   Gun and Gear Cult


Mantis X10 Elite

  Mantis has brought out their top of the line training system, the Mantis X10 Elite. The X10 does all the things the original Mantis X did, and lots more. I reviewed the original Mantis X about one and a half years ago. I was impressed with it. When they offered to send me the X10 for review, I immediately said yes. The new X10 is even more impressive and smaller.

X10 mounted on a rifle handguard. solid green light means X10 is connected and on.

  As most of us know, dry fire training works extremely well to improve shooting skills. The Mantis X10 Elite makes it easy and fun. No more just aiming at a light switch and practicing trigger pull. The X10 will help you understand what you are doing wrong. In my case, the score tells me how much I suck. But touch the red part of the score, and the X10 will tell you what you did wrong, and more importantly, how to fix it! The higher the score, the better you are doing. Or the errors you have are not as noticeable. Part of the fun from the X10 comes with competing against your friends, family, or in groups of people. 

  The Mantis X10 Elite has a plethora of training options and choices. It will work on pistols, rifles, shotguns, and even bows. I’m going to leave out talking about archery, because it is not in my wheelhouse. In all of these firearms, you get all the training options in the app. All of the training drills of the original X have been included. These include: Open Training, Shot timer, Benchmarks, Surprise Break, Primary and Support hand, Reload drills, Cadence drills, plus a new one, Hostage drills. The rifle section even has Slow fire and Rapid fire training at different ranges and positions. Yes, that is a lot and I won’t go over them all. One of my new dry fire favorites is the Hostage taker drill. In this drill, at the buzzer, you draw and then fire at a post-it note (or something). To complete this, you must score an 85 or higher. My other favorite is the Standard open training. Once you “start”, you just dry fire as normal and it scores you and tells you what you are doing wrong. Once you press “stop” it gives you an average score, along with other analysis stuff.

Draw Data

  From my standpoint, the new features on the Mantix X10 are what make it shine. New are Holster draw and Recoilmeter. Of course, holster draw isn’t for the rifle. I use an adapter for the magazine baseplate, this allows me to mount the X10 on the base of a magazine instead of on the handguns rail. Mantis sells adapters for pistols without forward mounted rails also. The draw analysis gives the user plenty of data. The data points it uses are: Grip, Pull, Horizontal, Target, and Shot. See picture marked “Draw Data” for explanations. There is also a movement chart, that shows those different data points in their respective colors. It also overlays all the movement charts, in each session, so you can compare them. The new Recoilmeter is perfect for someone like me. It literally gives me useful data for reviews. It can also work very well if you are tuning a muzzle brake to your specific ammunition or finding which ammunition has the least amount of muzzle rise for your rifle. As one can guess, the Recoilmeter only works with live fire. The data points received from the X10 are: Recovery time, Muzzle rise, Recoil width, and recoil angle.  See picture marked “Recoil Data” for explanations. I did have some trouble with this portion of the app. When rapid firing, the X10 wouldn’t read all of the shots. Somewhere between 30-50% of them wouldn’t record. But on a good note, when I shot slower, all of the data was recorded. For me, the Recoilmeter allows comparisons of different muzzle devices, or lack thereof. Thus giving the readers actual data on muzzle device reviews. These new options for the X10 can really aid in dry and live fire drills.

Recoil Data

  Options for all types of training and firearms are included in the X10 and corresponding app. In the settings, one can choose dry fir, live fire, or CO2 fire. The CO2 option is so that an airsoft or similar training firearm can be used. This then gives the user a better simulation of recoil. Allowing for even better training when sitting at home in your favorite chair. Live fire training with the X10 can help refine what was learned in all the dry fire practice. The X10 can be mounted just about anywhere on a firearm and still work just fine. This is kind of nice, especially if you use it on multiple firearms.

  Just a quick note about the Mantis X10. It’s small. It uses a little flip thing to attach it to a picatinny rail. It has a Micro-USB charging port, comes with a cable, but no light to see when it is charged or charging. But since the charge lasts 20 hours, it doesn’t really matter that much. There is an estimated battery life, with percent, in the app, but it is hard to find in the settings tab.

  What can the Mantis X10 Elite do for you? It can definitely make you a better shooter. It can give you the dry fire training everyone probably needs, and it can be fun. The X10 is really a great training tool for anyone, from the novice to the expert. The new recoil and holster draw components make it shine above the original Mantis X. Go give Mantis a look, I have been extremely happy with their products.

Firearms Insider Reviews - 8 Key Points

Claim to Fame:

Training aid for Rifles, Shotguns, and Pistols

Target Market:

Those wanting to improve their skills 

FNBs (Features & Benefits of this product):

Dry Fire

  • Live Fire

  • Handgun analysis

  • Rifle analysis

  • Shotgun analysis

  • Archery analysis - requires separate app

  • Training modes/drills

  • Courses

  • Coaching tips

  • History Tracking

  • Groups and Messaging

  • Muzzle trace tracking

  • Trigger control analysis

  • Shot timer

  • Smoothness analytics

  • Consistency comparisons

  • Recoil analysis

  • Holster draw analysis

  • Lever Quick Disconnect

  • Weight - 14 grams

  • Battery Life - 20 hours

What other aesthetic options or finishes are available?

Mantis X2, X3, X7

What others are saying?:

 Mad_Dog on Amazon 4 out of 5 stars

Great training system

This is a must have for the serious self defender and the person worried about trigger control.

The dry fire setting is wonderful. You can practice your dry fire and holster draw with dry fire.

Has other drills in the app (both Apple and Android) too.

Training feedback is through the smartphone. I have a headset that I use at the shooting range that has Bluetooth built in so there is no problem hearing the feedback after each shot.

This system works with dry fire, live fire and CO2. Yes, this system does cost as much as some firearms, but is well worth the money.

Link to other reviews:

Range 365

Price point:

MSRP = $249.99

Retail = $249.99 on Brownells

I need it now! Availability:

Mantis or Brownells

Our Rating:

Pros:

  • Recoil analysis 

  • Holster draw analysis 

  • Small and  lightweight 

  • Fits almost any firearm (comes with shotgun barrel adapters)

  • Great Training aid

  • Free app updates

Cons:

  • Slow to pick up recoil

  • No charging light

  • Price

Score: 8.50 Great

85.jpg

Favorite Link:   Gun And Gear Cult

XS RAM Night Sights

  XS Sights has added another type of night sight to their lineup. These new sights are called RAM sights. RAM stands for Radioactive Material. Since they are Tritium night sights, the name is appropriate. XS offered to send me a set after seeing the F8 sight review, and I eagerly accepted.

  The RAM sights are a semi-standard 3 dot system. I say “semi-standard”, because they are equipped with XS’s Glow Dot Technology. This technology allows the ring around the front sight to glow. I chose the green ring this time, since the F8’s, I reviewed previously, have the orange ring. The front sight ring absorbs ambient light through photoluminescence and then glows. If you shine a bright flashlight on the front sight, it glows really bright for about 10 minutes, and then slowly returns to the normal color. I like the Glow Dot feature, mainly because in some lighting situations, tritium can wash out and you are left with just a standard sighting configuration. The Glow Dot helps me pick up the front sight in those conditions.

Low light, no glow

Glowing front sight after shining flashlight on it. Notice that it glows so bright there is actually a reflection off the slide.

  As with all XS sights, the RAM’s use tritium inserts. The tritium will glow green for years. In fact, XS warranties them for 10 years, not just on the tritium, but also the sights. When I compared these to other tritium sights, they seem to glow just as bright, which is quite bright. The 3 dot sight system has 3 dots, wow, imagine that! Each dot is a tritium vial. Two in the rear sight, one on each side of the notch. Then one in the middle of the front sight. In low light, one just puts the three dots in a horizontal line and the sights are “lined” up. The front sight also has the Glow Dot feature around the tritium dot. The rear is all blacked out except for the tritium dots.

Front sight, immediately after shining light on it. Notice it is so bright that it reflects off of the slide.

Front sight glow, a couple of minutes after shining light on it.

  Besides being “night sights”, the RAM’s make good daylight sights too. The RAM’s use a front sight width of 0.145” and a square rear notch of 0.170”. This gives me a real good, fairly precise, sight picture. When looking down the sights, this combination gives me light on both sides of the front blade, which I really like for more precise shooting. Having that big green dot on the front sight makes it really easy to see and pick up on your target (think fast sight acquisition). It’s almost like having a fiber optic front sight. Let’s just say the daytime sight picture works really good for me. 

  Since the RAM sights sent to me were for a Glock, I installed them on a Freedom Flag products slide. In fact, the slide I used was the same one I had previously mounted XS’s F8 sights on. Installation was straight forward. A front sight tool and threadlocker was provided in the package. The front sight fit snugly, as did the rear. If you don’t think you can install the sights yourself, XS can do it for a small fee.

  In my opinion, the RAM sights are really designed for a carry gun. They are very durable. The front edge of the rear sight is straight up and down. This allows for easier slide manipulation with one hand. The back edge of the rear sight is also angled inward, from top to bottom. This is done to help reduce glare off of the sight. A pretty smart addition. 

  XS sights did a great job with the RAM’s. I am excited that they are bringing out more of the “standard” style of night sights. The only bad thing to be said, is that they don’t offer the RAM’s in a tall version to be used with a mini red dot or suppressor. Go give XS sights a look, their new options are just awesome.

Firearms Insider Reviews - 8 Key Points

Claim to Fame:

Night Sights 

Target Market:

Those wanting 3 dot night sights on their handgun

FNBs (Features & Benefits of this product):

  • Tritium Powered Front & Rear Sight

  • High-Contrast Color Front Sight - Available in bright orange or green

  • Ember Glow Dot - Photoluminescent dot absorb ambient light and glows in low light

  • Rear Sight Overhang - Reduces rear sight glare in bright light

  • Anti-Reflective Rear Tritium Lens

  • Rear Sight Ledge - Aids in one-handed slide manipulations

  • CNC Steel - Extremely durable for duty use

  • 10 Year Warranty - No Questions Asked Night Sight Warranty

  • 0.145” Front Sight width

  • 0.170 Rear Notch Width

What other aesthetic options or finishes are available?

Orange Front sight

Link to other reviews:

The Firearm Blog

Price point:

MSRP = $109.99

Retail = $99.99 on Amazon

I need it now! Availability:

XS Sights or Amazon

Our Rating:

Pros:

  • Bright Tritium

  • Green Glow Dot

  • Made in USA

  • Easily seen front sight

  • Everything included in package (front sight tool, thread locker)

Cons:

  • No “tall” option

  • Tritium washes out (a fault of all tritium sights)

Score: 8.50 Great

85.jpg

Favorite Link:   Freedom Flag Products

Rescue Essentials ankle kit

There has been rise in the addition of medical equipment to the “EDC lifestyle” and rightly so in my estimation. With more and more folks realizing, as the old cliche goes, they are their own first responder and unintentional trauma being of of the leading causes of death and, according to some sources, the leading cause for people under 45; it seems like a no brainer to carry some equipment to buy some time in the event you or a loved one needs medical attention right now. Things like tourniquets, gauzes, pressure bandages, chest seals and the like are all the rage right now and with proper training can absolutely save a life. 

But how the hell do you carry all that? What with the stuff you already have, which of you’re anything like me includes: gun, knife, flashlight, OC, spare ammo, wallet, keys phone etc. 

On your ankle of course. Enter the rescue essentials ankle medical holster. I will start by saying, I had low expectations for this as it was one of the cheapest ankle rigs I could find on amazon that would meet my basic requirements. I understand that “you get what you pay for” ordinarily. But before I dropped bigger money on an ankle kit I wanted to see if I could even get used to the thing strapped to my leg. I should also point out that the carrier is about the only thing medical related that should ever purchase from amazon. 

About $25 and two days later the ankle pouch arrived. Seems to be made well but more about that later, has one main pouch with a flap and two narrower slots. It also has a small area of molle webbing. So I stuffed it with all the goodies and strapped that sucker to my leg. 

According to rescue essentials, this rig is designed for one tourniquet (either a CAT or SOFTT-W), a 4” izzy bandage, and two pair of gloves. They also claim a SWAT-T and decomp needle can also be accommodated. Not one to be told what to do, I packed it how I saw fit for my lifestyle. While I have switched a few things here and there. I currently load it with (1) CAT gen7 TQ, (1) hyfin vented chest seal, (1) pack of celox gauze, (1) pack NAR compressed gauze, a CPR face shield, two pair of gloves and a small admin flash light. 

After the initial few days it became quite comfortable and now, two years later, I don’t even notice it anymore.  I have very few concealment problems with it, in “tactical” pants it’s a nonissue. In some jeans I have to remove the chest seal, and if you wear cowboy boots on a regular basis you might want to explore other options. It’s not impossible and I’ve done it a few times but it’s a pain.  Obviously, if you’re a shorts or skinny jeans kind of guy/gal this isn’t gonna work either. It is comfortable although I prefer to wear it over socks but will occasionally not. It holds everything in place very well, the only exception to this was the sharpie I tried to carry on it. But ridding on my ankle in the environment and elements that close to the ground, the damn thing is would never write when I needed it to anyway so I ended up not carrying it anymore. I never put a decomp needle in it so that’s the only thing I can’t really speak on, however, for the vast majority of people I don’t think that is a necessity, especially in an on body kit. I do have one in my vehicle kit. But that’s a different article. 

My biggest complaint is the molle webbing (actually PALS because it’s the host not the attachment).  I can’t see adding any molle accessories and it still be the slightest bit concealable. I did attach a few things like a multi tool pouch, a mag pouch, and a handcuff pouch. None proved to be useful. I do keep the small flashlight in the web and did the same with the sharpie. Not the intended use but I do what I want. I would much prefer to see this section replaced with another flapped pouch for another 4” Izzy. This would allow me to carry an additional chest seal and a compression bandage (Like the NAR ankle rig is set up for) the only other complaint I have, which is minor, is I’d like to see a flap to cover the TQ. Not a huge deal but it would protect the “time” strap from fraying as quickly. 

Overall, I think this is a good choice if you’re looking to build a small persona trauma kit and not break the bank. 

FIREARMS INSIDER REVIEWS - 8 KEY POINTS

CLAIM TO FAME:

Low cost ankle medical pouch 

TARGET MARKET:

People looking for a way to add medical gear to their edc without filling their pockets even more 

FNBS (FEATURES & BENEFITS OF THIS PRODUCT: 

  • Lightweight

  • Comfortable

  • Cost effective

  • Elastic storage bands and pouches

  • Customizable to user preferences

  • Main Pouch has a red tab for instant identification

  • Three pockets plus a 2 x 3 PALS ladder

WHAT OTHER AESTHETIC OPTIONS OR FINISHES ARE AVAILABLE? 

Black with a red tab 

What others are saying:

Amazon  - Luis N. B

I’m only 5’1”

Reviewed in the United States on January 24, 2020

I purchased this product because I like being prepared for the worse but I don’t have a lot of space on my belt or vest since I’m smaller than most. This product fits well on my ankle after putting all the products shown on my picture. I carry my tourniquet on my belt so I use one of the pockets for a naloxone and needle decompression. On the big pouch I carry chest seal and quick clot. On the other pocket I carry compressed cause and a space blanket. You can also see I carry an NPA and the medical scissors. One thing to be mindful is not overpacking it If your pants can’t stretch as much. I recommend practicing with whatever uniform you have. Overall, good product.

Price point:

MSRP = $30.00

Retail = $27.49 on Amazon

I need it now availability:

Rescue Essentials or Amazon

Our Rating:

Pros:

  • Works as intended

  • Stays put

  • Comfortable

  • Inexpensive

  • Durable 

Cons:

  • Limited space

  • TQ isn’t covered at the top

 Score: 8.00 Great

80.jpg

Infinity Target with "zones"

  Anyone that shoots, knows about replacing targets. Infinity Targets has come out with a solution for anyone using USPSA/IDPA silhouettes. They are making reusable rubber targets that look like those cardboard humanoid ones. When I first noticed these, I knew I just had to have one. Infinity Targets agreed to send me one.

  Construction of the Infinity Target is recycled rubber. Similar to the “rubber dummy” style, but flat and thinner. The target depth runs about ¾”. They then paint one side white. I was sent the target with “zones”. The zones are cut into the target to resemble the scoring zones on a USPSA target. When I first received the Infinity target, these zone marks were black, but after painting over the target, they are now the same color as the target, but still noticeable.

  The Infinity target came with 2 heavy duty metal clamps. These included clamps are used to clamp the target to a stand. When I say “stand”, I mean the typical 2 piece, 1”X2”, wood uprights, that are typically slid into some type of metal base. The 2 clamps hold the target to the sticks pretty good. The target itself is not light, I’d say it weighs around 10-12 lbs. If the sticks in your target base are loose, the target can seem to lean a little. Another set of clamps will fix this, but I just lived with it because it wasn’t enough to matter. Replacement clamps are pretty cheap, should you choose to shoot one.

  These type of targets are great for practice. Since the Infinity Target has zones, you can see where your hits are. Seeing the hits is helpful if you compete. I even used it to sight in a few pistols. If you get too many holes for your liking, just grab your can of spray paint, and paint over the hits. I will mention that since the target is self healing, the marks it makes in the paint do not look like the nice holes in a paper target. 

  Every range trip, I take the Infinity Target out. The range I use does not allow steel to be shot with rifles any closer than 100yds. It’s for safety, and I understand. By using the Infinity Target, I am able to shoot rifles on the pistol bays. Plus I just paint it when I paint my pistol steel target. I am also able to shoot the Infinity target at very short distances. At muzzle close distances, it doesn’t blow apart like cardboard targets. If you live where it rains a lot, I do, the rubber doesn’t soak up water like paper or cardboard, so you can shoot longer in the rain. The target also works as a nice paper target backer, just staple your paper target to it and go. 

Closeup of 12 gauge slug

Back side of target - slug hole

  I have pretty much shot the Infinity Target with everything I have. As one might expect, hollow points will do more damage to the target. This is because they literally punch a hole out instead of pushing their way through. Infinity Targets says you can use anything up to 12 gauge 00 buck, but no slugs. The smaller calibers like .22lr and .223 hardly do anything to it. 9mm and up seem to actually do more damage to the target itself. Now, I shot 00 buck at about 3 yards, it took a pretty big chunk, out of the back side, of the target, but no visible holes. I did shoot one 12 gauge slug at it, it put a nice size hole in the target (I expected this). After 4 months and probably well over 1000 rounds, it’s still holding up well.

Circles are 00 buck impacts from 3 yards

  If you don’t want the Infinity Target white, just paint it. If you want it to look like a USPSA cardboard target, paint it a brown color. I painted mine grey as it is slightly harder to see. The darker the color, the harder it is to make out where you hit the target. I like this for training because I can’t see the hits and have to just go on training. I did notice that “flat” paints and primers do a better job of covering the target and covering of the bullet holes.

  The Infinity Targets, zone target, is nice. As the saying goes, I would recommend it to a friend. Shipping costs aren’t very cheap because of the size/weight, but sometimes Infinity Target’s has deals on shipping. If you are looking for some sort of usable, reusable, target, definitely go give them a look.

Firearms Insider Reviews - 8 Key Points

Claim to Fame:

Reusable Torso target

Target Market:

Anyone wanting a reusable target

FNBs (Features & Benefits of this product):

  • Reusable

  • Comes with clamps

  • “Zone” lines

  • Approximately 0.75” thick

  • Self sealing

  • Up to 12 gauge 00 buck ammunition

  • Uses regular target sticks and stands

What other aesthetic options or finishes are available?

No Zone lines, Hostage add on

What others are saying?:

Ben A. at Infinitytargets.com  5/5 stars

Great for close contact drills

I am the training director at diamondback shooting sports in Tucson, Az. These targets are awesome for our close contact drills. Paper targets last all of two rounds from close distance, but these targets hold up great. They seem to take as many rounds as full size rubber dummies but for 1/4 of the price! Would always suggest these targets, and will be ordering some for our sales floor asap!

Link to other reviews:

None found

Price point:

MSRP = $55.00

I need it now! Availability:

Infinity Targets

Our Rating:

Pros:

  • Takes multiple hits

  • Uses standard target stands

  • Paintable

  • Made from recycled rubber

Cons:

  • Heavy-ish

  • Clamps can be shot

Score: 7.50 Good

75.jpg

Favorite Link:   Gun and Gear Cult


Atibal SLR-1

  I first learned about the Atibal SLR-1 red dot at Triggrcon. To say the least, I was impressed with the prototype I handled. After some time, the production versions were released and they sent one for review. The SLR-1 is 1x20 red dot sight.

  There are a lot of red dots on the market, but only a few are even similar to the Atibal. The Atibal SLR-1 is solar and/or battery powered. The solar works so well that I even ran the red dot without a battery, in overcast weather. Because the SLR-1 is so efficient, it has a combined battery life of over 100,000 hours, that’s over 11 years! Another innovative feature is the removable solar panel, should you break it or something, just order a new one. Much better than ordering a whole new sight. When in the “solar” mode, brightness adjustment is done automatically depending on ambient light. One can switch over to “manual” mode if they want to set the brightness level.

  As with most red dots, the Atibal SLR-1 has a bunch of expected features. The SLR-1 has a 2 moa dot or a 35 moa circle dot reticle. 8 brightness settings, 1 of them is night vision compatible. It’s shockproof, water proof, parallax free, nitrogen filled, and has multi-coated lenses. The battery is easily accessed on the side of the sight, as are the multi-use buttons. Length on the SLR-1 is 3”. Weight is 5.6 ounces. It comes supplied with a very nice AR co-witness mount, but has mount compatibility with Aimpoint T-1 and H-1 mounts

  Now that all the technical stuff is out of the way, let’s dig into some of the good stuff. My SLR-1 came in a nice plastic padded case with everything needed to mount it, zero it, clean it, and cover it, they even threw in an extra battery. I can’t say enough good things about the supplied mount. Most supplied mounts are usable, but not great. The Atibal mount is sturdy, good looking, and mounts very securely. A wrench is even supplied to tighten down the mount.

  Actual use of the SLR-1 is where it shines. The dot and circle dot are very clear. Looking through the 20mm tube, I see little to no color differences. Because the solar panel is mounted on top, it picks up light well. When using the “solar” mode, the brightness of the dot is automatically adjusted. One drawback to the “solar” mode is that you can only use the 2 moa dot reticle, not the 35 moa circle dot. The auto brightness function adjusted brightness extremely well, never did I feel like the dot was too bright or too dim. It is also very responsive to changes in ambient light. To switch over to the “battery” mode, just tap the “+” button and you are now using the battery. Here you have manual brightness adjustments. As you can guess, “+” increases the brightness, and “-” reduces the brightness. The dot does flare when turned up, but that’s pretty normal for any red dot. Since we are on “battery” mode, if you hold down the “-” button for about 3 seconds, the reticle will change over to the 35 moa circle dot. After using the circle dot, I think I prefer a 65 moa dot over the 35 moa dot. Mainly because the bottom of a 65 moa circle is the height over bore zero of an AR at 7 yds. Now if you want to switch back to “solar” mode, just hold down the “+” button for about 3 seconds.

  I’ve been using the SLR-1 for around 4 months. I really like the 2 moa dot and hardly ever use the circle dot. Like mentioned before, it is super clear and easy to find the dot. It has held zero, even with me bouncing it off a wooden bench. It’s light, so it fits in well with the carbine it is on. One design aspect I like is the protected turrets. Yes, it makes it harder to get the caps on and off for adjustment, but protects them from being broken off. Speaking of caps, the turret caps also can be turned over and used to adjust the windage and elevation, both of which are 1 moa adjustments. The actual clicks on the adjustments are pretty good also. There is no problem hearing or feeling them. 

  Atibal did a stand up job designing the SLR-1. It’s clear, tough, and has some of the best battery life in the game. The use of industry standard mounts is smart, as is the multiple reticle option. Plus it has a lifetime warranty. Atibal has been upping their game in the optics industry, definitely give them a look.

Firearms Insider Reviews - 8 Key Points

Claim to Fame:

Solar Red dot sight

Target Market:

Those wanting a red dot with solar capability

FNBs (Features & Benefits of this product):

  • Solar and battery powered with run times in excess of 100,000 hours

  • Removable solar panel

  • Parallax Free

  • Easy accessible battery (no tools needed)

  • Shockproof

  • Multiple Dot System (MDS)

  • 1 Hour Auto Shut Off when in battery mode

  • Multi-coated lens

  • 2 MOA dot, 35 MOA circle dot

  • 1 MOA click adjustments

  • Brightness - 8 Settings (1 night vision, 7 daylight)

  • Detachable Co-witness mount

  • Lifetime Warranty

  • Nitrogen Filled

  • Water Proof

  • Battery - CR2032

  • Length 3"

  • Weight 5.6 oz

What other aesthetic options or finishes are available?

None

What others are saying?:

Rich F. on Atibal 5/5 stars

Sweet dot!

Competitive 3-gunner, USPSA shooter, steel challenge ringer, and firearms enthusiast. I’ve owned the SLR-1 for almost a half year now. I have almost a thousand rounds with it on my competition shotgun. It's had up to 1,400pfs shells through it throwing 1 3/8 ounce of shot and don’t forget about slugs and buck shot. I can’t wait to run this thing next season in competition. Awesome dot, slim, good looking, love the solar feature and dual reticle. The circle dot setup maybe perfect on the shotgun! I'm proud to own four Atibal optics, and I’d recommend them to anyone. The price and no BS warranty seals the deal on these guys! Great job Atibal, I'm excited to see what other optics you guys come out with. I’d recommend this brand and product to anyone.

Link to other reviews:

Nothing found

Price point:

MSRP = $379.99

Retail = $323.00 at Rainier Arms

I need it now! Availability:

Atibal or Rainier Arms

Our Rating:

Pros:

  • Clear, Crisp Dot

  • Solar

  • Replaceable solar panel

  • Circle dot

  • Industry standard footprint

  • Protected turrets

Cons:

  • 35 MOA circle dot

  • Dot only when using solar

Score: 8.50 Great

85.jpg

Favorite Link:   Gun and Gear Cult

Midway USA Range Backpack

The Midway USA range backpack measures 17in x 15.5in x 9in, has three removable pistol bags and the two main compartments can be combined to form one single compartment by removing the divider between them. The  zippers on the top compartment, main pistol compartment and pistol cases are lockable. There is a shell in the pistol compartment which adds support and can be removed to join the two main compartments together. In front of the top compartment is a smaller pouch for smaller items (cell phone, pens etc.).  The water bottle pouch will hold a 750mL Camelbak bottle easily.  There is plenty of Molle webbing on the back and side to attach accessories.

I used this backpack in classes where the ranges were in a remote location so you had to carry in what you needed.  This backpack easily held what I needed for the range sessions and the padded straps distribute the weight sufficiently to make the backpack comfortable.  

When i was in remote areas with no access to a table the backpack would remain upright and the cover for the pistol compartment makes a nice work area and keeps small items off the ground (so they don’t get lost). The top compartment can store several boxes of ammo or whatever you want to put in there.  The side compartment can easily accommodate ear muffs and a small first aid kit. 

I loaded the three pistol cases with six Glock Mags and a Glock 17 pistol in each and had an issue inserting them into the pistol compartment.  I could get two in easily but to insert the third i had to slide out the first two and then slide the third one in between them and then push them in.

The construction is decent for what i used it for, but is not designed for heavy use.  

All said, this backpack does what it is designed to nicely and is handy for carrying range items to remote areas.  


Firearms Insider Reviews - 8 Key Points

Claim to Fame:

Versatile range backpack

Target Market:

Anyone looking for a range backpack.

FNBs (Features & Benefits of this product):

  • 8 x 10.5 x 8 pistol compartment 

  • Large upper compartment.

  • Top front compartment with additional zipper pocket

  • Side compartment with mesh pouch and zipper pocket

  • Pouch on the side which can hold a 1L bottle

  • Three removable pistol cases which measure 6.5 x 9.5 x 2.25.

  • Two elastic loop target holders

  • Molle on the back and sides

What other aesthetic options or finishes are available?

This only comes in coyote.

What others are saying?:

4.8 out of 5 stars on Amazon.com (based on five reviews) 

4.8 out of 5 stars on MidwayUSA (based on 42 reviews)

Link to other reviews:

Amazon.com

Price point:

Retails for $129.99, but can be occasionally found on sale at Midway USA for $112.99.

Retail = $129.99

I need it now! Availability:

Midway USA or Amazon

Our Rating:

Pros:

  • Versatile range backpack 

  • Three removable pistol cases which can be used 

Cons:

  • Does not seem to have enough space to hold three fully loaded cases.

  • Construction is not for ‘rugged’ use. 

Score: 7.0 Good

70.jpg


SiOnyx Aurora Sport

  Night vision seems to be on everyone's want list. Really, who doesn't want to see in the dark. The cost is usually what keeps most of us from getting into it. Welcome to the SiOnyx Aurora Sport day and night vision camera. We have discussed the Aurora's on the podcast. I now have had actual hands on with the Sport version and co-host Rob has the Aurora Explorer edition. 

  The SiOnyx Aurora Sport, sports a lot of features. It's touted as an action camera. So you get 720p video at 60fps. This allows for okay videos. The actual camera megapixel rating is 0.9MP's. This doesn't allow for great snapshots, but is that really why we're discussing the camera. What really matters is the 3 different camera modes, day, twilight, and night. More on that later. The Sport also has some water resistance to it. It has an IP67 rating: so under 1 meter of water for 30 minutes. It uses a standard micro-sd card that is not included in the Sport version. One rechargeable battery is also included. 

Extreme low light - color, No IR

Extreme low light - black & white, No IR

Extreme low light - green, No IR

  The real question is, how about the "night vision". To start things off, it's not normal night vision. SiOnyx uses a really large sensor in their digital camera. This allows way more light into the camera. By doing this, you get a really good low light camera. Plus it is in color, or way more colors than normal night vision! For all you die hards out there, there's an option for green monochrome or black & white. If it is real dark, you will need some sort of extra illumination, like an infrared flashlight. When using IR, the colors will change slightly, but still essentially color! The IR light is a definite need on cloudy nights. Even with some ambient light, the picture would start to pixelate without IR. 

Low light - Night mode

Low light - Twilight mode

  I proceeded to take some photos with the Aurora. Because of the small camera sensor, the pictures aren't great. For instance, you can tell my dogs are dogs with the night mode turned on. Daylight picture are far better. As far as video goes, it's better than the pictures when in night mode. But it is also far better in daylight. Like I mentioned before, it really needs an InfraRed illuminator for really dark pictures and video. At night, I think it would best be used for target identification.

Battery and SD card access

  Since the Aurora Sport is sold as an all around sporting night vision camera, I had to try it on a rifle. Especially since they show the other Aurora model on a rifle in their advertising. To make things short, the sport flat out sucks on a rifle. When mounting behind an optic (the optic in front of the camera), the parallax is so bad that shot impacts were 3 feet low at 30-50 yards. Rob also had this problem with his Aurora Explorer. This was with a 1-6x scope and a red dot. I then proceeded to mount it in front of a red dot optic. It did at least get rid of the parallax, so shots hit where I was aiming. There was also a problem with this set up. Not enough light was projected on the camera’s sensor, so the night mode worked worse than without an optic. I was going to film, through the red dot, during the day, but the next problem happened. Every time I would shoot the rifle, an AR15 in 223, the battery compartment and eyepiece would unlatch and turn the camera off. This was with the camera mounted toward the front of a handguard. So, if you are looking at mounting this on a rifle, I would highly discourage the Sport model for this. The Explorer edition comes with a picatinny mount that, I am told, keeps the eyepiece from unlatching during recoil.

Candle light - Day mode

Candle Light - Night mode (color)

Candle Light - Night mode (color)

  What would I use the Aurora Sport for? With an IR illuminator it can be used for viewing wildlife at night. Tactical use is pretty much out because the IR light can be seen with any form of night vision, including other Aurora’s. As a sport camera, it would work okay, but the lack of autofocus really kills it in this area too. It does however use the camera industries ¼-20 mounting threads and makes it hook to almost any tripod. The ability to see the picture through an app on your phone or tablet could come in handy, especially if you mounted it to some other radio controlled device.

  The Aurora Sport is an okay nightish vision camera. I would really like to be able to use it on a rifle, but mount it on a helmet with an IR illuminator and have some fun. The price isn’t bad for what you get. SiOnyx keeps improving these camera’s, with a “pro” version out now. Maybe an autofocus is next.

Firearms Insider Reviews - 8 Key Points

Claim to Fame:

Night Vision Camera

Target Market:

Those wanting some sort of night vision capabilities 

FNBs (Features & Benefits of this product):

  • Water resistant - IP67

  • Color or Mono display

  • 1" optical sensor

  • Lenses - f/1.4 (Night), f/2 (Twilight), f/5.6 (Day) – 16mm

  • 720p video

  • 0.9 MP photos 

  • Wi-Fi and USB connectivity 

  • Micro SD card to 32 MB

  • Micro OLED display

  • Rechargeable battery pack

  • Approximately 8 ounces

  • Approximate size - 4.75” x 2.5” x 2.0”

What other aesthetic options or finishes are available?

Regular Aurora, Aurora Explorer Edition, PRO

What others are saying?:

⅘ stars on Amazon 

A low resolution low light camera - not night vision

  This is a decent low light camera. Sensitivity is primarily achieved by larger pixels and by removing the IR filter which takes full advantage of the spectral sensitivity into IR of modern sensors.

  Here are the negatives: resolution is very low and on a moonless night it really struggles. This is definitely not comparable to gen 3 night vision as the video's on the manufacturer's website suggests. Those are very misleading. This camera / tech is probably more comparable to a Gen 2 night vision device.

  But for the price it does a decent job. The connectivity to smartphones is very useful.

Link to other reviews:

Standard Aurora review

Price point:

MSRP = $399.00

Retail = $399.00 on Amazon

I need it now! Availability:

SiOnyx or Amazon

Our Rating:

Pros:

  • Color Night vision

  • Water resistant

  • Wi-Fi connectivity

  • Lightweight

  • Price

Cons:

  • Needs InfraRed Illuminator

  • Manual focus

  • Adds Parallax

  • Problems when mounting on a firearm

Score: 6.00 Okay

60.jpg

Bravo Concealment Holster (IWB and OWB)

  Bravo Concealment bills their holsters as “the best in everyday concealed carry.”  When they offered to send me a holster to review my expectations were high, however, when I received the IWB holster, at first, I was ambivalent.  

  The holster is constructed from two pieces of Kydex which are joined together by four screws that also hold the belt clips in place.  The following items were in the bag:  

  • IWB Kydex Holster (for Glock 17)

  • Single magazine holder

  • Extra fasteners

  • Two additional belt clips

  The pistol is aligned vertically with the holster shell (i.e. no built in cant) but the belt loops are adjustable for ride height and cant angle.  The belt loops are at an offset angle to allow for better concealment (they call it Torsion Technology). The pistol fit securely in the holster with no slack or rattling.  A loaded magazine was inserted in the pistol and holstered. I tried to shake the pistol loose but was not successful.  

  The holster was comfortable to wear and the pistol could be inserted and removed with ease.  I am overweight and most IWB holsters are uncomfortable, particularly when seated. With this holster I experienced a little discomfort, but not nearly as bad as others.  

  I used this holster for a few months, took it to several training classes and it worked fine.  Drawing was simple and fluid and I could re-holster without sweeping myself (important for use on ranges).  

  In addition an OWB holster was ordered for review (paid for by reviewer).  This holster is larger than the IWB model and pistol is slightly canted forward in the shell.  Similar to the IWB the holster can be adjusted for ride height and cant, although not as much as the IWB holster.   

  This holster was used in a training course without prior testing (a mistake on my part).  The holster held the pistol a little too tight, which resulted in the pistol pulling up the holster when drawing.  This caused me to use my left hand to hold the belt down to aid in drawing. The instructor informed me that I was dangerously close to sweeping my hand, which would result in disqualification, so i changed the holster to the IWB model.  

  When I returned home customer service was contacted.  They asked me a few questions to verify I was using the proper firearm, belt etc.  Once this was established they promptly provided a prepaid shipping label to send the holster back to be repaired.  Once the issue was corrected the holster was returned, at no cost, and the draw was much smoother. This is great customer service. 

Firearms Insider Reviews - 8 Key Points

Claim to Fame:

Kydex IWB holster

Target Market:

Anyone who is looking for holster for their pistol  

FNBs (Features & Benefits of this product):

  • Belt Clips are adjustable for ride height and cant.

  • Currently shipping with a fee magazine holder.

  • Reasonably priced.

  • Available in Left and Right hand holsters

  • Available in Glock, Smith & Wesson, SIG and several 1911 platforms.

What other aesthetic options or finishes are available?

Black

What others are saying?:

63 reviews give it a 4.7 out of 5 stars on Amazon.com 

Link to other reviews:

Amazon.com

Price point:

MSRP = $49.99

Retail = Currently on sale for $44.99 from manufacturer.  

I need it now! Availability:

Bravo Concealment website - $43.39 with extra mag holder

Amazon.com - $39.99 with extra mag holder

Our Rating:

Pros:

  • Currently shipping with magazine holder,

  • Designed for multiple platforms

  • Can accommodate lights.

  • Available for left-hand use.

  • Lightweight

  • Easy to draw from concealment. 

  • Great customer service.

Cons:

  • Not currently making models for FN pistols. 

  • Belt clips do not work with belts > 1.5 inches

  • Only comes in black.

Score:   8.5 Great

85.jpg

Walker Defense NERO 556 muzzle brake

  Walker Defense has come on the market with some truly innovative products. One of those is the NERO 556, a 3D printed hybrid muzzle brake/compensator manufactured from Inconel.. By using state of the art 3D manufacturing, Walker Defense was able to design the NERO without the constraints of normal machining. I had watched one of their videos on the NERO and needed to see if it was really that good, so I reached out to them for a review sample.

  3D manufacturing brings a whole new level to muzzle brakes. Walker Defense uses an additive manufacturing process called DMLS (Direct Metal Laser Sintering). Basically this process uses a laser to melt powdered metal together. By using this process, Walker Defense was able to design a muzzle brake that doesn’t have to use standard machining processes. Instead, they designed it using fluid dynamics for the best possible reduction in muzzle rise and recoil.

nero8.jpg

  The NERO 556 is manufactured using inconel. Inconel is a superalloy known for its resistance to heat, pressure, and corrosion. You may have heard about inconel because some suppressor companies use it for the initial blast baffle. Inconel is not the easiest metal to machine and thus can add a huge cost. By laser sintering the inconel, costs can be kept down some. 

  Walker designed the NERO for zero muzzle rise. It is optimized for a 14.5” or 16” 5.56 (.223) barrel length. If you run it on a shorter barrel, it definitely pushes the muzzle down. I know this because I tried it on a 11.5” and a 7.5”. It does this because the pressure going through the NERO is much larger on the shorter barrels. Walker Defense actually sent me a cutaway diagram (see picture). The diagram helps to understand what is going on with the NERO, and why it looks the way it does. As Walker Defense mentioned:

“It (nero) was designed using fluid dynamics to force the gases to take a different trajectory than the bullet. Upon entering the muzzle device, the vectored flow nozzle (#1) acts as an inverted ramp, and along the dimpled compression ramp (#2), focuses a jet of gas into the curved blast surface (#3) directly below the bore. This focused gas striking the curved blast surface is intended to create a balanced counter-recoil force that directly counteracts the rearward and upward recoil with a downward and forward counter force.”

  Now that we know the technical description, here is my take. The NERO 556 works like nothing else I have ever used before! Like I mentioned earlier, I did try it on a 11.5” and 7.5”, but most of the use was on a 16” barrel. Running the NERO on the 16” did exactly as stated. Recoil was reduced extremely. Most importantly, muzzle rise was effectively eliminated. The recoil impulse almost felt as if it was slightly pulling away from my shoulder. When I tried it on the short barrels, results varied. On the 11.5”, recoil was reduced and the muzzle dipped a little during recoil. On the 7.5”, recoil was reduced also, but more importantly was the huge downward force pushing the muzzle down. I would recommend also running it on a 14.5” or 16”, as it was designed for that. With the shorter barrels, there was also more concussion from the blast. With the 16”, I didn’t really notice it, as it is less than other muzzle brakes I own. While shooting a standard USPSA target, at ranges from 5-25 yards, A-zone hits were really easy. Even when I shot really fast, the muzzle stayed on target and the hits were all on the target. FYI, the AR15 that the NERO resides on weighs in at 6 pounds empty.

  Walker Defense also noted about handling the rifle differently. When shooters use the NERO for the first time, some have a tendency to pull the muzzle down during recoil. With the NERO, this is definitely not needed. Since I was warned about this, I literally shot the rifle with the handguard resting on a flat hand, after first installing the NERO. Yes, it shot very flat with no support. However, I did go back to my standard grip without any problems. 

  I was trying to measure recoil and give a comparison, but the data wasn’t there. I did get a few decent readings on muzzle rise (see attached screenshots). The last one in the group is always off because I moved the rifle after the last round was fired. All of the ones I have are in the standing, off hand, position. The average muzzle rise is near zero. This is consistent with what Walker Defense say about the NERO.

  The NERO 556 may not be for everyone, but it should be. If you are a competitive shooter, you need this. If you just want reduced muzzle climb, you need this. If you want faster follow up shots, this will definitely help. The NERO may seem pricey at first, but after shooting with it, you will probably change your mind. The videos put out by Walker Defense really are how the NERO shoots.

  The NERO is definitely innovative. Just by looking at it, the NERO 556 doesn’t look like your normal compensator/muzzle brake. Well, it isn’t, thanks to the 3D design and sintering. If you want an awesome, recoil and muzzle rise reducing, muzzle brake, look no further than the NERO from Walker Defense Research.

Firearms Insider Reviews - 8 Key Points

Claim to Fame:

3D printed muzzle brake with soft recoil and ZERO muzzle rise

Target Market:

Those wanting the best technology in a muzzle brake

FNBs (Features & Benefits of this product):

  • Reduced Recoil

  • Minimal muzzle climb

  • Standard ½-28 thread pitch

  • Use on .223 Remington, 5.56 NATO, .224 Valkyrie

  • Inconel 718

  • PVD coated

  • Pre-drilled hole for pinning and welding on 14.5” barrel

  • Direct Metal Laser Sintered

  • Weight: 3 ⅝ ounces

  • Length: 2.6 inches

  • Individual Serial Numbers

  • Optimized for 14.5”-16” barrels

What other aesthetic options or finishes are available?

NERO 9 and NERO 762

What others are saying?:

5/5 stars  Carl @ Walker Defense Research

Incredible Upgrade

There are lots of ways to spend money on AR-15’s these days... The Nero 556 is one modification that made an immediate, substantial improvement to performance of my AR. Muzzle rise was virtually eliminated allowing for faster and more accurate follow up shots. My buddy’s girlfriend had never shot a rifle and handled it with ease. It is well made and installed easily. I will be buying more!

Link to other reviews:

Jerking the Trigger

Price point:

MSRP = $179.99

I need it now! Availability:

Walker Defense

Our Rating:

Pros:

  • Zero muzzle rise

  • Reduced recoil

  • Faster follow up shots

  • PVD coating

  • 3D printed Inconel 

Cons:

  • Price

Score: 9.00 Amazing

90.jpg

Favorite Link:   Gun & Gear Cult